DMDE
Ryan
DMDE is a data recovery software that can recover data from hard drives, external drives, USB drives, memory cards, and other storage devices. It can recover data from formatted, deleted, and inaccessible drives. It can also recover data from drives that have been damaged by viruses, malware, or other malicious software.
You can download DMDE from the official website. The software is available for Windows, Linux and Mac. here
DMDE supports NTFS, FAT12/16, FAT32, exFAT, Ext2/3/4, HFS+/HFSX, ReFS, APFS, btrfs and runs on Windows, Linux, macOS, DOS.
There are three version, Express (1 Year), Standard and professional. The Express version is $20. The Standard version is $48 and the Professional version is $95. I recommend the multi OS versions.
The documentation is very good and there are many videos on YouTube. The software is very easy to use and has a very good user interface.
You can find the documentation here
I would like to quickly walk you through the procedure to recover data from a formatted drive, using the documentation as a guide.
The initial documentation has the following steps:
- Find and Open Volume
- Data Recovery
- Partition Management
- Full Scan
- Device Selection
- Device I/O Parameters
- Disk Images and Clones
- RAID Arrays
- File Panel
- Disk Editor
- Cluster Map (File Allocation)
- Menu Commands
For this post we will follow the steps for data recovery only.
Data recovery has three steps:
- find and open a volume containing lost data
- open/reopen the virtual directory
- select items and then navigate to Menu > Tools > Recovery
However, before we start, we need to make sure that the drive is not being used by another program. If it is, we need to close the program.
In my last video, I didn't show you how to make an image of a drive, so before we begin we need to make an image of the drive. This is a good practice to follow before you start any data recovery.
There are two common formats for a forensic image. The first is the E01 format and the second is the DD format.
Let's start with DD image, there is also my favorite program Dc3dd that I use on a regular basis and some like to use Dcfldd , but for simplicity, we will use the DD command.
It is also a good idea, and industry standard to take a hash of the drive, and image, but that's out of the scope for this post, and I don't want this post to be super long and boring.
First you need to identify the correct drive, failing this important step can cause you to overwrite the drive you are trying to recover data from, with catastrophic results. So make sure you are using the correct drive.
For demonstration purposes I will be using a USB drive, but you can use any drive you want. I will also make my life easier and use a Linux machine, but you can use any OS you want. I am writing this blog post on a Windows 11 machine. I will be using the Kali Linux operating system.
Step 1: Identify the drive
lsblk
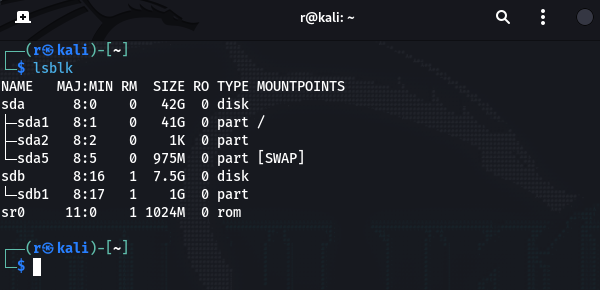
In this screenshot the partition we want to image is named "/dev/sdb1" a 1Gb partition. The drive is a 8Gb USB drive, but we're just doing the 1 Gb partition.
If we want to grab the shasum of the drive we can use the following command:
shasum /dev/sdb1
in my case its '0b3208' for this partition only. Let's make our image now.
Step 2: Make the image, make sure you are using the correct drive, and you have enough space for the image. We can check the hash after we create the image and compare. If they match we know we have a good image.
dd if=/dev/sdb1 of=image.dd

And the hashes match, great!
There are other image creation software available, but for now let's move on to the data recovery steps.
Step 3: Open DMDE
Find and open a volume or image. In my case, I will select the flash drive partition instead of the image to save time, but you can select any drive you want, or use the image you created which is the correct way.
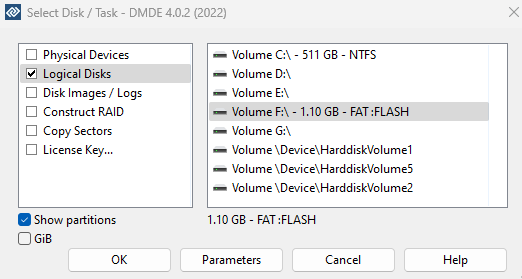
I've highlighted the partition named FLASH (F:) in the screenshot above. I will select it and click Open Volume.
Earlier I copied a wallpaper to the drive, then I deleted the wallpaper from the drive, now we will recover it. Once the FLASH partition is open, in the pane to the right, I can see my deleted file.

Now with the file selected, I will navigate to Menu > Tools > Recover. CTRL + U is a shortcut for this. In the popup
window I will make sure marked only is selected in the Source and Destination pane, check the file, then check
the Recover to: the destination for the recovered file. Then hit OK.
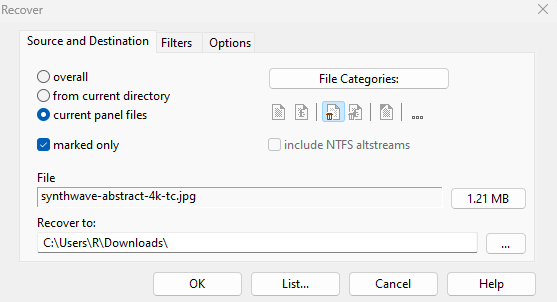
When the recovery process has finished you will get a pop-up notification of its success. You can then close the program.

And now the file I previously deleted is now recovered in my destination.
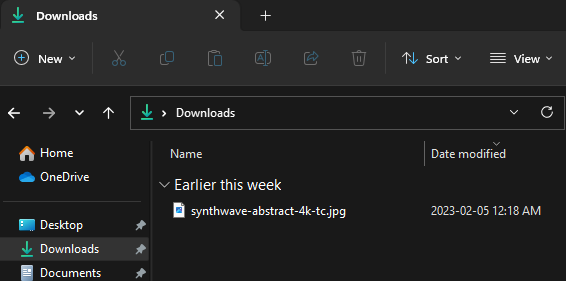
There we have it, we have recovered a file from a formatted drive.
Nice video explaining file recovery from an image
I hope you found this post helpful. If you have any questions or comments please connect with me on social media, or email me!
Thank you for reading. I hope you have a great day!
